Automatic FREE SHIPPING on all US orders over $200
- HOME STAGING
-
ART
-
SHOP
- CUSTOM
-
ABOUT
- CONTACT
Automatic FREE SHIPPING on all US orders over $200
September 01, 2015
Ever get that flea market fever?
You know, when you’re really pumped about going to the flea market and then you get there and you’re sort of overwhelmed by the possibilities so your brain starts flitting around like a bird in a swarm of mosquitos? Sometimes I feel like I can’t even see properly, I’m not even joking. My eyes and brain are overstimulated by print, pattern, texture and colour. It’s pretty awesome, but sometimes it makes you convince yourself of things that aren’t always 100%…true.
So when I came out to the Bay Area to visit Aaron this winter one of the things I really wanted to check out was the Alameda Point Antiques Fair (aka the Alameda Flea Market). It happens the first weekend of every month, and there are over 800 vendors. ALSO: California weather means that it’s almost guaranteed to be sunny and awesome. It’s also almost guaranteed that there will be horrible traffic on the way there, but that’s a whole other story.
So I grabbed my friend Chen (a talented local jewelry designer) and we hit the market!
So in terms of “things I always want to buy but don’t really need more of” chairs are pretty high up on the list. Lamps, shoes and jewelry are strong contenders as well. But there’s something about chairs…
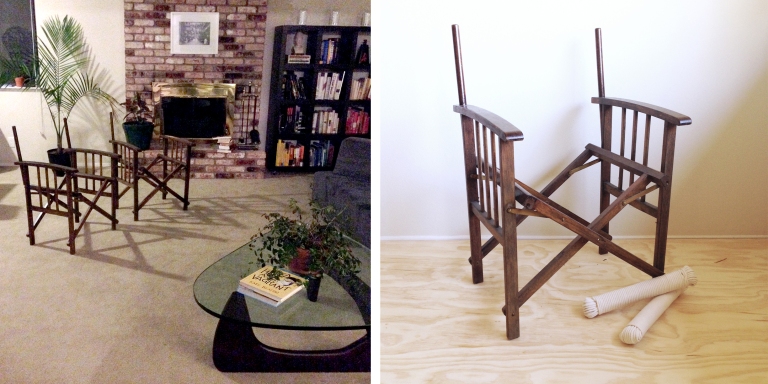
I had been Pinterest stalking chairs (as usual) and had folding chairs on my mind. Then I came across two wooden campaign style directors chairs, $20 each. They were perfect! Except…they had no canvas covers. Naked. Frame only. The sewer/crafter in me thought “no problem! I can whip something up easily!”.

Except that I had no sewing machine in California.
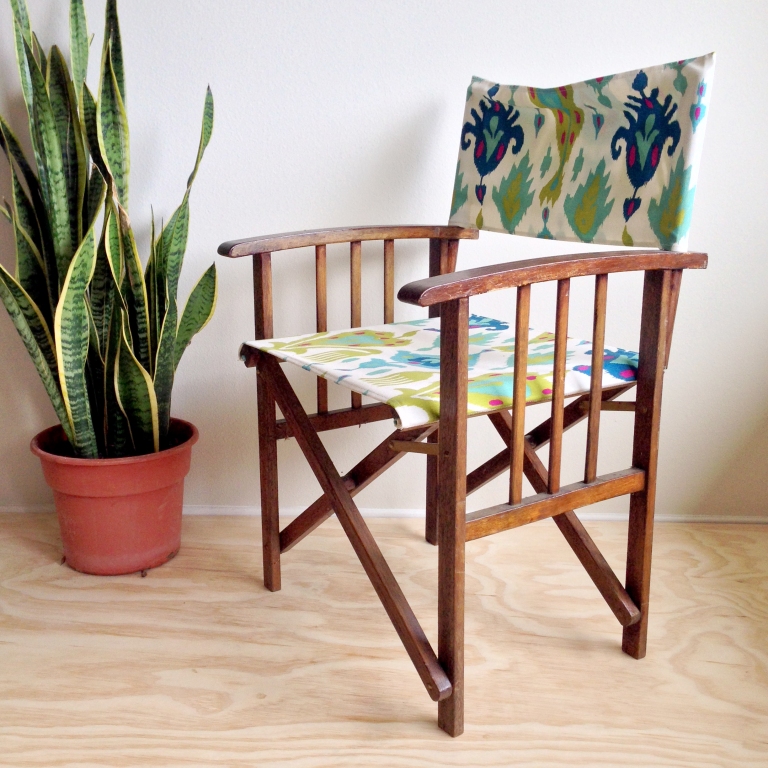
So what did I do? I stupidly bought pre-made printed canvas ones on sale at a local big box store.
I wanted white, they didn’t have them, I got impatient and bought a bright patterned set.
There’s a lesson to be learned here folks. It has something to do with patience…maybe not buying things on sale.
I’m not really sure…I’m pretty certain I didn’t really learn the lesson.

So yeah, in the end I wasn’t really happy with what I had bought, so I sort of just crankily pushed the chairs to the side of the living room and half heartedly planned to sew something for them when I went back to Montreal. I didn’t actually bother to take any measurements though before I left so really…that wasn’t going to happen.
Fast forward a few months and I’m back in Novato, HAUNTED by these fucking chairs. I know they could be so good.
SO GOOD
Then, my Pinterest stalking paid off. I saw a vintage chair made of wood and rope, and a lightbulb went off. I headed over to the Ace Hardware on a multi-project supply trip and grabbed a few bundles of 7/32″ cotton clothesline cord (for indoor and outdoor use). I bought 200ft total, but should’ve bought 300ft (150 per chair).

With a little bit of online tutorial research, and a long hard look at the above pic I decided on the look I was going for and started experimenting.
TIP #1: If you weave back and forth with very little space in between, you will run out of rope really really fast.
I realized this while starting the back of the first chair, which is how I decided to included a triple loop around the post in between each cross-pole band. It also gave the spacing an airier feel, which I was into. I was also really into not having to buy more rope.
TIP #2: Leave a long-ish tail (5-6″)at each end
Often I end up being cheap with materials and trying not to waste anything, but by leaving this longer tail you just give yourself a bit of flexibility in the design as well as being able to weave the end back in on itself, which makes the whole thing stronger and tighter.
TIP #3: Check for mistakes as you go along
Because there is nothing, NOTHING more annoying than finishing a large section and realizing you messed up the pattern halfway through. Check a LOT as you go. A lot.
This is the part I’m happiest with, than you vintage chair inspiration! The center row of weaving gives the chair the stability it needs and I really like how it connects the seat and back.
Honestly I thought this was going to be a lot more frustrating than it was. I just put on a movie, took it slow and made sure to keep the rope tight. Overall I’d say it took about 1 hour to finish the chair, maybe an hour and a half. At a bundle and a half of rope per chair the cost of the rope (the only material) was $20.
So $40 each per chair total…not too shabby.
ONE THING TO NOTE: Although the chair theoretically CAN still fold (like, it physically can) it sort of messes up the ropes, since the tension is part of what holds them neatly in place. I realized this going in, and made the decision that the folding aspect was not that important to me. If you wanted to maintain the foldy-ness you should use a different weaving technique, something that holds the rope tight against the frame with knots…something like this.
Comments will be approved before showing up.
August 24, 2018

If you're afraid of committing to a "colour scheme" in a room, this is a great option. Choose white walls, medium tone woods and a bed that goes with everything and you'll be set for years. This also allows you to indulge in the fun of grabbing new throw pillows and bedding every once in awhile...and we all know that throw pillows are to home decor what shoes are to fashion so...DECISION MADE. (cont'd, click the header to read more)
January 11, 2017

I am a collector. I've been accused of "almost being a hoarder". I'm pretty sure I've been this way my whole life. I'm also pretty sure this is just a physical manifestation of how my brain works, and in turn, how my creativity works. (cont'd)
December 15, 2015

For awhile now (what….like 10 years maybe? I’m totally not putting a lot of effort into this guess) white walls have been the modern decorating standard. Sure, there are always the “fun” “quirky” homes that I see here or there but let’s be real…around the early/mid 2000s most interiors focused sites/mags sort of just wanted a palette […]![]()
